
Heinkel HE 111 Guide
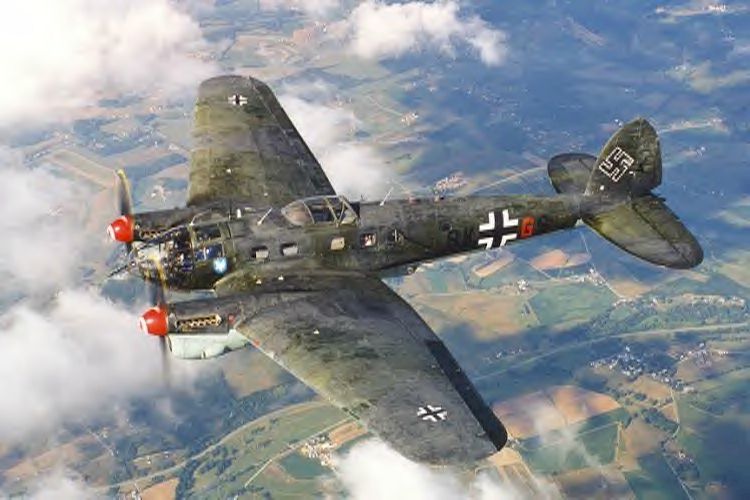
HE 111 owned and operated by the Commemorative Air Force, Mesa, Arizona, USA. Photo taken over Frederick, Maryland, USA in August 2000 by Gregory Witmer (Captain Video Productions), from Larry Kelley's B-25 "Panchito." This aircraft was lost in an accident in July 2003.
Historical Info
When World War I ended, the German Air Force was disbanded under the Treaty of Versailles, which required the German government to abandon all military aviation by October 1, 1919. However, by 1922, it was legal for Germany to design and manufacture commercial aircraft, and one of the first modern medium bombers to emerge from this process was the Heinkel He 111, the first prototype of which an enlarged, twin-engine version of the single-engine mail-liaison He 70, which set 8 world speed records in 1933 flew in February of 1935. The second prototype, the He 111 V2, had shorter wings and was the first civil transport prototype, capable of carrying 10 passengers and mail. The third prototype, He 111 V3 also had shorter wings and was the first true bomber prototype. Six He 111 C series airliners were derived from the fourth prototype, the He 111 V4, and went into service with Lufthansa in 1936, powered by a variety of engines, including BMW 132 radials. The first production models had the classic stepped windshield and an elliptical wing, which the designers, Siegfried and Walter Gunter, favored.
As a military aircraft, it took longer to gain favor, because military load requirements and underpowered engines kept its cruising speed down to less than 170 mph. However, in early 1936, the plane was given 1,000 hp Daimler Benz DB 600A engines which improved performance dramatically enough to bring in substantial orders. The first two mass-production versions, He 111 E and He 111 F experienced great success during the Spanish Civil War, where they served with the Condor Legion as fast bombers, able to outrun many of the fighters sent against them.
In fact, the experience in Spain generated a false sense of security in which the Germans thought that the He 111's light armament and speed would be sufficient in the coming war. Thus, although it was out of date, the large numbers in which it had been produced made the He 111 the Luftwaffe's primary bomber for far too long in the war, availability being more persuasive than practicality for this serviceable, but highly vulnerable, aircraft. Modern fighters like the Supermarine Spitfire and the Hawker Hurricane proved the He 111's inadequacy during the Battle of Britain. As soon as possible, the Luftwaffe replaced the Heinkel with the Junkers Ju 88, reassigning the Heinkel to night operations and other specialized tasks until, by war's end, it was being used primarily as a transport.
More than 7,300 had been built for the Luftwaffe by autumn, 1944, with another 236 (He 111H) being built by the Spanish manufacturer, CASA, during and after the war (as the CASA 2.111), some with the traditional Jumo 211 engines, some with Rolls-Royce Merlins. In service with the Luftwaffe from 1937 to 1945, the Heinkels remained in Spanish service until 1965.
One of the more bizarre adaptations of the Heinkel by the Luftwaffe was the He 111 Z-1, in which two He 111s were joined at the wing with a special section containing a fifth engine. Two prototypes and 10 production models were manufactured, their purpose being to provide the power to haul the huge Messerschmitt Me 321 transport gliders.
The sole remaining He 111 in regular use was owned by the Arizona wing of the Commemorative Air Force in the USA. It was a Spanish-built CASA 2.111D that was used to transport VIPs during the Franco regime. Unfortunately, it was destroyed in a crash in July 2003.Nicknames: Pedro (Condor Legion nickname);
Specifications (He 111H-16):
Engines: Two 1,350-hp Jumo 211F-2 inverted V-12 piston engines
Engines: Two 1,350-hp Jumo 211F-2 inverted V-12 piston engines
Weight: Empty 19,136 lbs., Max Takeoff 30,865 lbs.
Wing Span: 74ft. 1.75in.
Length: 53ft. 9.5in.
Height: 13ft. 1.25in.
Performance:
Maximum Speed at Sea Level: 227 mph (365 km/h)
(Without Bombs and Half Fuel)
Max Speed with Max Load at Sea Level: 217 mph (349 km/h)
Ceiling: 21,980 ft.
Range: 1,212 miles
Armament:
One 20-mm MG FF cannon (180 rounds)
One 13-mm (0.51-inch) MG 131 machine gun(1,000 rounds) in dorsal position
Three 7.92-mm (0.31-inch) MG 81Z machine guns;
Internal bomb-load of 2,205 pounds.(Note that Wings of the Luftwaffe by Eric Brown lists slightly different armament info)
Number Built: 7,300+
Number Still Airworthy: None (CASA 2.111D destroyed July 2003)
World War II Online HE-111
Keymap
Settings
We
want to set are Flap settings for better use then just up and down. Click
on Keymapper from the main menu.

Now 0% is flaps full up
and 100% is flaps full down. In the 0% Double click on it and just hit
backspace at the top of your keyboard and so on 20% hit = etc....
After you set your flap controls click on exit and click OK when it asks
if you want to save it

Trim Setting
Lets set the trim by
double clicking on the keyboard next to Elevator, Aileron, and Rudder

Now lets change the 5%
to 2% for each Trim this will give us better control over our trim
settings.

Armament


Instruments
It is very important to know your instruments since they will tell you how your aircraft is performing and if there is anything wrong. This section I will go over each instrument and tell you what it does and how to use it. The picture below will show you what and where all the instruments are. The He111 has instruments in 3 different views as seen below.
Front

Front Down

Pilot Position Seat Up and
Right view

Altimeter:
This is used to tell you how high you are from sea level not the ground.
Watch before you takeoff from a field and see how high you are so when you
come back to land there go by that mark as you can see here I am at .1 km
from sea level sitting on the ground.
Airspeed Indicator : This gives you a indicated speed it is
not a true speed or the ground speed what happens is wind is blown into a
little tube on the wing and it is then transferred to the ASI. If you were
sitting on a field and the wind was blowing lets say
10 km/h into the tube then your ASI would show 10 km/h
Compass Repeater Dial : This works like a compass on the
game but in real life it was a navigational compass it would point to the
next way point on a flight plan using radio waves picked up by either set
towers or even regular radio signals (so just tune into that English music
station and head for it hehe).
Directional Gyro: This is a compass but not a
Magnetic Compass
Slip and Turn: This shows how much your aircraft is banking
and how much the tail is slipping on the planes axis. For a coordinated
turn you would go into a bank and keep the ball in between the lines if
done correctly it will keep you from feeling the turn and keep the plane
stable in the turn (STEP ON THE BALL) means which ever way the ball is
from the lines that's the rudder you need to use if it
was to the right of the lines then you would
use Right rudder to bring it back to center.
Propeller Pitch
: This would show your Propeller Pitch angle. On
ww2online your have 3 settings Economy, Continuous, and Max. This was used
to set your pitch to your Throttle speed in
wwiionline it is set in the automatic position. Max rpm's are
used for starting, takeoffs and landings. Once they took off they would
set it to the continuous setting since the max would cause over speed of
the engines making them overheat, it could also damage the engines.
Continuous settings would let the pilot climb, cruise and engage in
combat. Economy was used around 6 km to achieve maximum range and to taxi
on the field. Max rpm setting with the throttle cut back will produce a
windmill braking effect. This would produce large amounts of drag on the
propeller and therefore slowing you down fast.
Variometer : This shows your rate
of climb/descent of meters per second. So if you are climbing at 10 m/s
you would make 600 m per minute. Best climb rate for the He111 is around
4.5-5 m/s. On landings you do not want to have a
glide scope less then -5 m/s.
Tachometer : This tells your engine speed Revolutions Per
Minute x100 so 22 rpm is 2,200 revolutions per minute.
Manifold Pressure
: This is the boost of the throttle kind of like a
fuel pedal in a car this just tells how much fuel is going to the engine.
In Germany this is called the atas and you
will see later how to use this when we start climbing.
Fuel Contents
: Tells how much fuel you have in the selected tank
right now you can not change tanks.
Engine Gage Unit
: Tells what your fuel and oil pressure are. If your
oil pressure starts dropping then start landing because your engine is
getting ready to quit.
Oil Temperature : If your oil gets too hot your engine will
lock up.
Oil Contents : Tells how much oil is in the oil tank. When
you get shot in ww2online two things could start leaking Fuel or Oil. If
your oil is leaking then return to base or land as soon as you can if you
run out of oil engine will lock up.
Landing Gear Indicator: This will tell you if your landing
gear is up or down. Green Light Indicates your gear is locked in the down
position and it is safe for takeoff or landing.
Positions
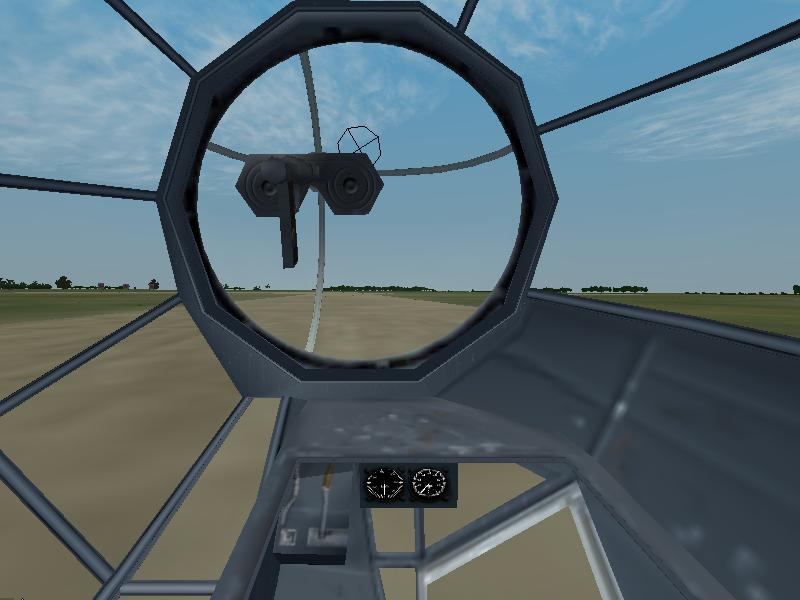
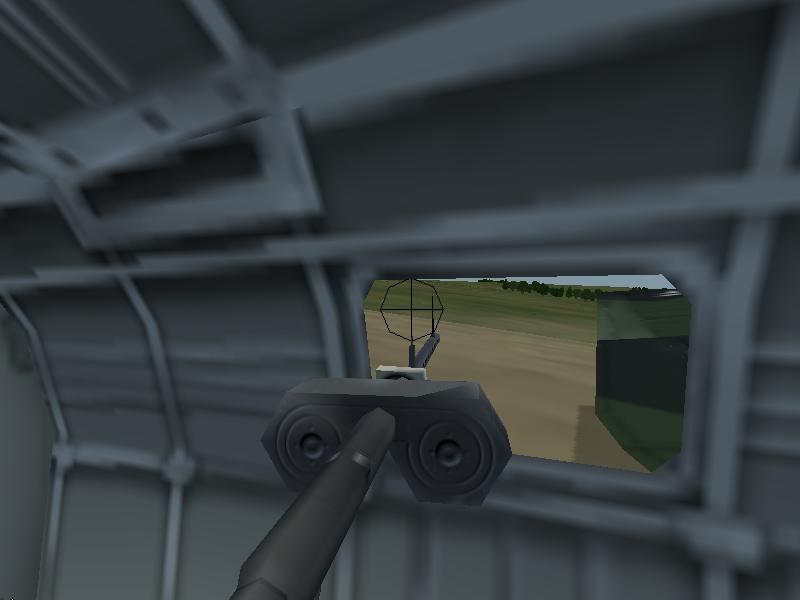
Hit the number 2 key for The Bombardier position, the bombardier had two different roles he was the Bombardier and the Front gunner. From the bombardier view you can see the Bomb sight and two instruments.

Looking closer at the Instruments you can see they are the Altimeter and the Air Speed Indicator.

Hit the Del key on your numpad 2x this will look in the bombsight at maximum zoom you can see the Altimeter and Airspeed markings with needles next to them. What you want to do is set your needles on the bombsight with the Altimeter and Airspeed indicators minus the Altitude of the target. Use the Page Up and Page Down keys to set your Altitude and the Home and End keys to set your Speed.

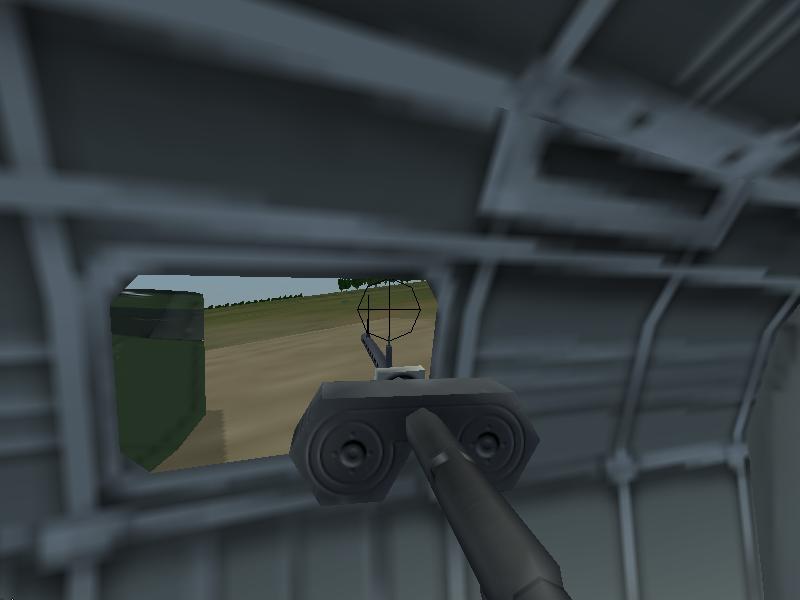
Now For the front gunning position the bombardier would pull a platform over the bombsight which he would then lay on his belly to use the front gun. To use the Front gun on wwiionline go to position 3 (position 2 is the bombardier) now press the D key to deploy the platform you can lay down on. This will move you forward to the gun.

The gun has two positions this will give you maximum arch on the right side.

Press the Del key on
the numpad to zoom in on the sight.
Now we will
go to the second position on the front gun now
lets hit the O key. As you can see from the
bombardier
view this will turn the gun into the left side.
Now press the Del key
to zoom in on the sight.
Position 4 Top Gun
The top gun has a canopy over
it you will not be able to move the gun until you open the canopy hit O to
open it.
Position 5 Belly gunner
The belly gunner is
good for those low fighter attacks.

Position 6 Left Gunner
If you looked to your
right from this view you can see the radio
instruments.
Position 7 Right Gun
Taxi, Takeoff, and Climbing
First thing we need to do it set the tail wheel lock by pressing / on the keyboard now we can start the engine up by pressing E, after the engine starts your rpm's will be set on economy so lets set it to max by pressing the " key twice your rpm setting has 3 settings Economy(2,100rpm) Continuous(2,200 rpm) and max (2,400 rpm). Now lets push are throttle up just a little and get the RPM to 1,000 to start moving to get into position with the rest of your flight group if you have one hehe. To turn unlock you tail wheel and use the wheel breaks to turn the is Z and X on your keyboard. You want to get lined up for take off where there is no obstructions when you find a good place lock your tail wheel and apply both brakes Z and X, press minus on your keyboard to bring your flaps down to take off position( only if you set your flap settings in the keymap like mine)

Now lets pull the Stick back a little over half way until the controls are about right here.

Now we are ready for takeoff lets push the throttle all the way forward to 1.35ata and aim down the runway at this point.

We will want to hold are Rudder all the way to the Right and correct as needed Brakes are useless on the He111 for staying straight. If you keep the aim that you want and don't let the stick move then up you will go nice and easy. Once in the air we will pull our throttle back to 1.15ata this will calm the engines down from the huge torque on takeoff.

Now lets aim with this
point while in the air it will feel like your nose is down but it is not.

Stay level until your
speed gets to 250km/h then we can start climbing a little harder.

At 1 km we will go down
to continuous rpm and full throttle. We want to climb around 4.5-5m/s

Now lets set are Rudder
to a more straight flight. Look at the slip
indicator under the Directional Gyro and try to get it between the lines
by pushing the L key.

Now lets climb to 3
km(9,840 ft) this is the best bombing Altitude for the He111 and 250km/h
(155 mph) and we will then go to Economy Rpm and keep full throttle and
start to level out.

Bombing Run
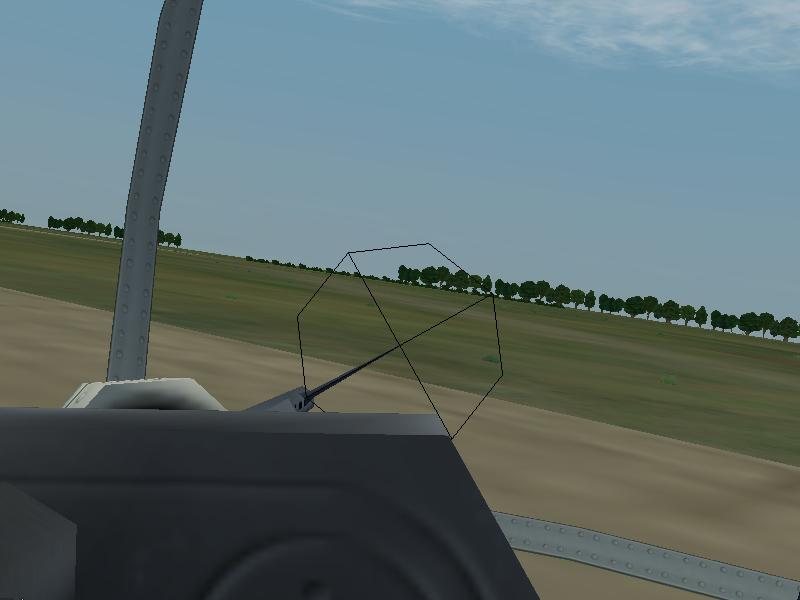
First thing we want to do is set our bombsight to the instruments so lets set 3km and 250km/h. Use the Page up and Page down key to set the Altitude and the Home and End to set the Speed.

Lets go back to the
Pilot View and get lined up on the Target. Use the Del key on your
numpad to get the down look view. We are a
little off to the Right so lets turn it left.

Ok to line up
from pilots view look at the V shape in the window in the middle of the
picture you can see the hanger we want to bomb so we are now lined up from
the pilots view lets go back to the Bombsight.

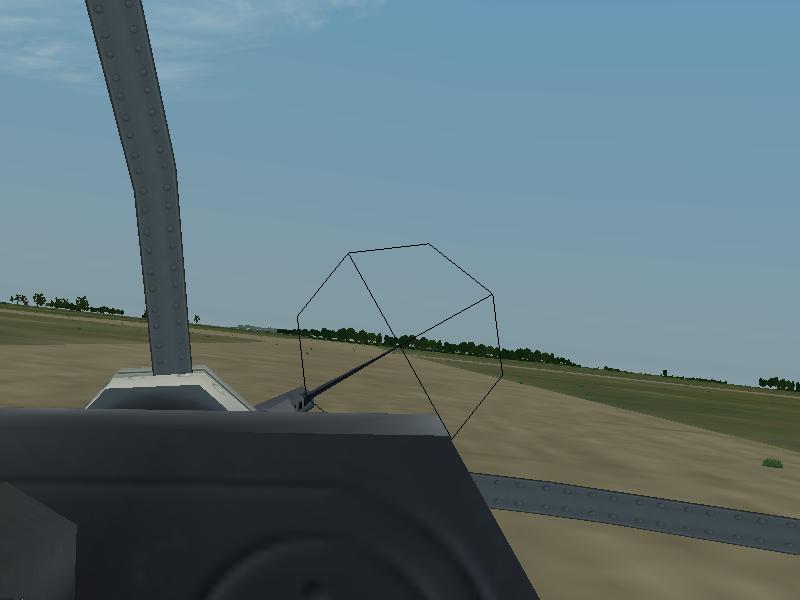
From the bombsight you
can see that the pilots view is almost dead on the hanger we want to hit.
You want to drop right before the target so the bombs have a path to
travel onto the target.

Bombs away lets go to the Belly gunner position 5 and look down with the Gun and see where the bombs hit. These bombs hit to the Right of the target why? Because I was bombing by myself I was unable to keep the plane straight from the bombsight. This can make a big difference when flying with a crew it is allot easier to bomb a target with 2 people. And a voice program is a very good tool for a bombing crew.

Descent
Setting for best Descent is to pull your throttle all the way back and watch your Airscrew Indicator, Prop speed needle will come all the way around and pass the other one now push your throttle back forward real easy and get the needles together.

Landing
Landing is the hardest part of flying. One mistake can kill you before touchdown. We will see how to setup for landing, go over the downwind leg, crosswind leg, the final approach, and the touchdown.
Downwind Leg
We will be landing here. Head toward the airfield on your map where we want to land, we will be landing in a west direction. Cross over the field and make sure there are no Enemy aircraft or ground units around the field. Now we will want to head into the Downwind Leg.

Now looking at the map we can see the path we want to take to land downwind leg, crosswind leg, and the Final. We want to enter the downwind leg around 1 km and a speed of 200 km/h if you are higher then this just circle the field and drop altitude and then head into the Downwind Leg. After starting the downwind leg we want our left wing tip to pass over the field. Now lets put down 1 notch of flaps down and keep the prop pitch needles together. Lets get our altitude down to .8 km (above ground) and get ready for the turn into the crosswind leg. Push the O key to raise the pilot so you can see better.

When the Airfield gets to our 7-8 o'clock position we will turn into the crosswind leg. Do not bring your nose above the horizon you want to let your altitude drop a little more.

Crosswind Leg
On the crosswind leg reset your prop pitch indicator to even needles and put another notch of flaps down need to get the altitude down to .5 km. Since we do not have a visual on the airfield we will use the map when we get to a point to where the airfield is almost to the 9oc position we will turn for the final.

Final Leg
Again do not nose up the plane when we enter into the Final Leg we want to be at .2-.3 km above the ground. Lets put full flaps down, landing gear down, and pull the throttle back and keep it at 2300rpm you can set rpm's anywhere with the throttle pulled back you just have to be easy on the throttle. You will have to watch the rpm and correct as needed. You want a glide scope of 145km/h and the speed must be kept there until hold off (point where you can cut throttle and sit it down). Now lets go back to the inside position.

Lets aim with this
point at the field.

Now this will put us into a glide slope where we can make a perfect landing. The nose is up but we are still going down but not fast, nice and easy.

Watch the rpm and keep the aim on the end of the field we are getting closer now. You will have to use allot of right rudder since we cannot use separate throttle controls for the engines.

We are keeping a perfect glide slope with 2300 rpm and aim at the end of the field. Almost there you can see the front of the field now in the picture. Nose is still up and we are still going down.

Now we are about 1 meter above
the field lets cut the throttle and put it down.

After touchdown hold your stick full back all the way now hold both brakes down. Good landing we made it down in one piece.

Last update on March 27, 2005
Individual logos, Trade Marks, photos, images, quoted text, etc., are Copyright © their respective owners and/or organizations. There is no intent toward copyright infringement. If you are the owner of a copyright/trademark and do not wish me to use it please email me. Thank You.
Note that this guide includes material from Stewart's HE-111 Guide, Cooper's Bombsite Guide, and the training I recorded over TeamSpeak of Aldman.